
A quick and easy guide to getting your basic sun salutations down!
From my experience, if you are interested in integrating yoga into your life, the first step is:
Surya Namaskara A
Once you can remember this short cycle of 11 postures, you can take your yoga practice with you easily to any place and practice at any time. It is not too complicated to have to warm up too much before and it is complex enough that you stretch and tone out your whole body within a couple minutes. In addition, there are plenty more benefits, that I will mention below.
So what actually is it?!
Surya Namaskara in Sanskrit is translated to Sun Salutations in English. The practice is designed to work on all body parts, organs, systems and chakras in the body. I believe it is the most efficient way to connect with our core inner fire and focus. The body is able to create powerful energy from the sun. It is recommended that you practice this as close to sunrise as possible to attain the best and most pure connection to the sun and it’s beautiful radiating power. There are other variations of salutations in yoga but for this blog post we’ll focus just on A.
A couple main points to note before we go over the postures:
- Breathe through the nose
- Go to your appropriate edge in every posture
- Practicing the sun salutations at a slow or fast pace will give you different results. You can find information on this here https://www.ncbi.nlm.nih.gov/pmc/articles/PMC3193657/
Let’s go over the postures!
Tadasana – Mountain Pose
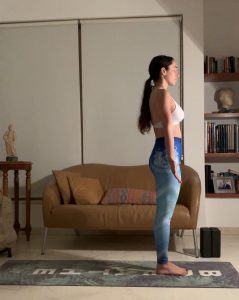
How-to: This is the starting posture. Stand with feet together or inner-hips distance if that’s more comfortable. Hands are by the hips with palm facing forward. Feel completely ground in the soles of your feet channeling a strong unmovable mountain.
Breath: Deep inhale & exhale
Benefits:
- Improving balance on feel and stability in the mind in coordination with the body
- Strengthens ankles, knees and hips for weight-bearing
- Great pose to work on your posture and improve it
Urdhva Hastasana – Upward Hand Pose
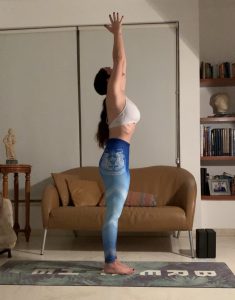
How-to: Inhale as you raise your arms overhead and connect your palms together. You should feel this pose from the roots of your feet all the way to your fingertips.
Breath: Inhale
Benefits:
- Lengthens the spine in turn clearing up congestion of the nerves
- Improves Digestion by stretching the abdominal muscles
- Expands the chest making breathing easier which can treat asthma and heavy breathing
Uttanasana – Forward Fold
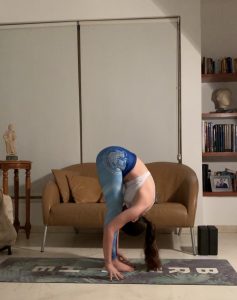
How-to: Exhale as you lower down into your forward bend. The weight should be in your toes, not your heels and bring your head to your knees. If you have any back issues, it is recommended that you work on your folds with a straight spine so you would not curl your head in. You can bend your knees or use a prop like a block if you can’t reach the floor.
Breath: Exhale
Benefits:
- Strengthen & stretches the muscles in the legs from the hips to the feet (hamstrings, calves, and knees get maximum expansion and improved circulation)
- Pressure at the abdomen region tones organs and muscles & can cure any stomach pains
- Fresh blood & oxygen flow to the head can treat headaches, insomnia, depression, stress and also brings a fresh glow to the face
Ardha Uttanasana – Half Forward Fold/ Halfway Lift
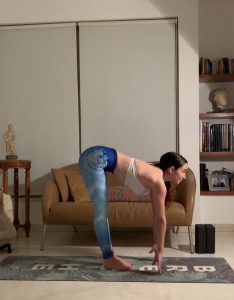
How-to: Lift halfway up from your forward fold so that your back is straight. I usually cue to look forward but you can keep your gaze at the floor if that is more comfortable for you. If you cannot straighten your back while still touching the ground, then you can place your hangs on your shins or thighs
Breath: Inhale
Benefits: It is more of a transition pose but will have the same benefits as a forward fold like in the previous posture
Chaturanga Dandasana – Four-limbed Staff Pose/ Low Plank
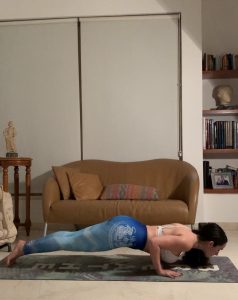
How-to: Place hands on the ground and walk/step/jump back into a high plank. From high plank, lean forward like you are looking over a cliff and lower down, keeping your elbows tucked close by your body. The goal to is stop at the 90 degree angle but you can stop before if you don’t have the upper body strength yet – don’t go beyond the 90 degree angle, as it is too much strain on your shoulder joint.
Breath: Hold breath as you move back into plank & exhale as you lower down into your Chaturanga
Benefits:
- Strengthen muscles in arms, shoulders, core, chest and upper back
- Improves spine posture
- Brings complete awareness to your body and breath because the entire body must be active to maintain this pose for longer periods of time, while breathing properly
Urdhva Mukha Svanasana – Upward Facing Dog
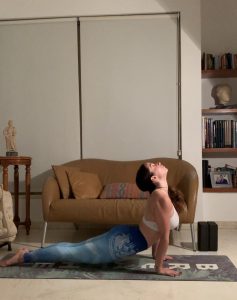
How-to: Flip your feet to go from being on your toes to being on the top of your feet and lift your upper body up and legs slightly above the ground. Slide shoulders down away from the ears and look up.
Breath: Inhale
Benefits:
- By stretching the neck, we stimulate many endocrine glands (pituitary, pineal, thyroid) in turn produces hormones to balance out the entire body
- Lengthens the spinal chord and improves posture
- Improves lung capacity by the deep expansion in the upper chest
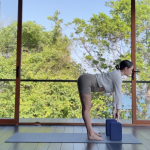
Adho Mukha Svanasana – Downward Facing Dog
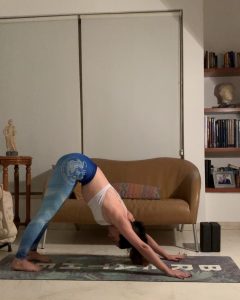
How-to: Flip feet to stand on soles, push off hands to lift your hips up and back. You should be in an upside down “V” shape. Feet are hips width apart and hands are shoulder width apart. What’s important here, is that your spine is as straight and long as possible. If feel a curve upwards in your back, then bend your knees (and keep them bent), push off your hands to bring your hips up higher and lengthen that spine! Last step would be to externally rotate the shoulders. The head is relaxed.
Breath: Exhale, then stay in position for 5 deep breaths before continuing
Benefits:
- Increases flexibility in joints
- Strengthens ligaments and muscles in legs and arm
- Relieves stress and depression by bringing more oxygen and circulation to the head
Complete the cycle by repeating the first 3 postures in reverse (ardha uttanasana, uttanasana, urdhva hastasana) and finishing it off with the last and 11th posture in the cycle:
Samastitihi– Equal Standing Pose
Breath: Exhale
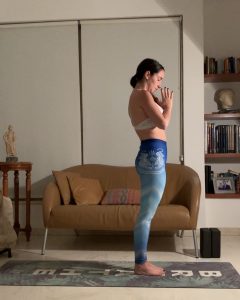
This pose is essentially the same as the first pose in the cycle. It is a command to stand in balanced stillness and with steady attention. The only difference in the first and last pose is that the hands are by the hips or here at heart center in Anjali Mudra (praying hands). You can choose to start or end with either or both physical poses however, the teacher will only say Samastitihi at the end of each cycle. It is done so that in your moment of stillness at the end of each cycle you will feel the prana (vital life energy force) traveling throughout your body and prepare yourself for he next cycle or posture.
In conclusion here are all the amazing overall benefits you will get from practicing the Sun Salutations:
- Strengthen and tone the body fully
- Raises your energy and self-awareness levels
- Become more flexible
- Boost metabolism
- Increase circulation of blood ad oxygen through the body and cells which makes your skin glow and keep you youthful & radiant
- It is a natural remedy for blood pressure fluctuations & heart-related problems
- Enhances digestion system to be able to absorb nutrients more easily
- Increases emotional stability
- Detoxifies the body
- If practiced actually the sun, you’ll provide a great amount of vitamin D to the body which it can only get from the sun
Contraindications
There are amazing benefits that come out of practicing the Sun Salutations but please speak to a doctor before just to confirm that you are in the clear for physical practice if you have any of the following conditions: heart issues, high blood pressure, arthritis, disc herniation, wrist injury, pregnancy.
Thank you for reading! Let me know in the comments if you tried it out and how it went for you 🙂
Sivahn
